5 steps to automate repetitive tasks in software development
Do you spend countless hours on tedious, repetitive tasks that hinder your software development process? You're not alone. A McKinsey study shows that developers spend up to 30% or more of their time on routine and manual tasks, leading to burnout and decreased productivity. Imagine if you could reclaim that time for innovation and complex problem-solving.
Automation is the key to streamlining your workflow and boosting productivity. By automating mundane tasks, you can focus on what truly matters: building high-quality software. This guide will look into the benefits of automation and provide practical steps to integrate it into your software development cycle.
TL;DR: Automation streamlines your workflow and boosts productivity by handling repetitive tasks. To automate repetitive tasks in software development, follow these steps:
Step 1: Identify the repetitive tasks
Step 2: Choose the right tools for automation
Step 3: Implement the automation tool
Step 4: Tips for integrating automation into your code workflows
Step 5: Follow best practices for maintaining and updating automation workflows
Let’s get into the details.
Step 1: Identify the repetitive tasks
This process begins with a thorough analysis to identify repetitive tasks that consume a significant portion of your time. Here are some examples of the common tasks that are repeated in the software development process:
- Code formatting: Code formatting guarantees that the written code adheres to predefined standards and styles, promoting readability and maintainability. Automation tools can apply these style rules across the entire codebase, enforcing consistency without the developer reviewing each code line manually.
- Writing and running tests: Continuous testing is crucial in identifying bugs early and writing high-quality software, but it can be time-consuming when handled manually. Automating the writing, running of unit, integration, end-to-end, and acceptance tests ensures the delivery of higher quality software and improved developer efficiency.
- Deployments: Transferring code from one environment to another, for example, from testing to production, requires serious attention to detail to avoid errors. Automating this process makes the deployments faster and more reliable. They can be executed with a simple push of a button, reducing downtime and increasing deployment frequency.
- API documentation: Keeping API documentation up-to-date is important for internal developers and external users, and manually updating this documentation can be tedious. Automation tools can generate and update API documentation directly from the codebase, making sure that the documentation is always accurate and reflects the latest changes without requiring additional developer effort.
- Code reviews: While the critical and creative aspects of code reviews cannot be fully automated, routine elements like checking for style violations, code consistency, or simple bugs can be automated. Automation tools can scan the code for these common issues before the human review process, streamlining the review by allowing humans to focus on more complex considerations.
- Database schema migration: This is another task that benefits from automation. As applications change and grow, so do their underlying databases, requiring updates to the database schema. Manually managing these migrations is risky and can lead to downtime. Automation tools can handle these migrations seamlessly so that the database schemas are updated without manual intervention, thus reducing risk and effort.
Now that we have identified some examples of tasks that need to be automated let's discuss how to choose the right tools for your automation setups and integration.
Step 2: Choose the right tools for automation
Selecting the right tools is essential for achieving effective automation. Identifying and choosing the best tools involves considering several important factors. These criteria can guarantee that the automation solutions are efficient, scalable, reliable, and adaptable to future needs. Evaluating each tool against these standards strengthens your automation strategy, enhancing productivity and operational excellence. Here are some of the criteria you should look out for when choosing the right automation tools:
- Compatibility: Verify that the tool integrates well with your existing technology stack.
- Ease of use: Look for user-friendly tools that require minimal setup and don’t have complex workflow.
- Scalability: Go for tools that can grow with your project’s needs.
- Community support: Choose tools with strong community or vendor support for troubleshooting and updates.
- Reliability: Choose tools that won't let you down or don’t have a known number of issues. They should work and save you valuable time.
- Customizability: Look for tools you can adjust to fit your needs and confirm that they work just right for your projects.
- Integration capabilities: Your tools should interact nicely with each other so that everything in your workflow connects in perfect harmony.
- Security: Find safe automation tools to keep your work secure. Always choose tools that meet data privacy regulations and are ransomware-free.
- Cost-effectiveness: Find cost-saving tools that give you good value for your money, are not too expensive, and give you a good return on investment.
- Performance: For job satisfaction, opt for fast and efficient tools that get you where you're going and save you time.
- Documentation and learning resources: Choose tools with clear instructions to help you learn and solve problems without confusion.
Some popular tools for automation include:
- Sourcegraph Cody: A code AI assistant that helps developers write, understand, and maintain code.
- ESLint: A code linter that automates code formatting and bug detection by applying predefined coding standards, enhancing productivity and code quality. It streamlines workflows by forcing consistency across the codebase.
- Jenkins: An open-source automation server that supports building, deploying, and automation in software development.
- GitHub Actions: This is a custom workflow or automation script integrated with GitHub. It enables the automation of workflows directly from your repository.
- Travis CI: Similar to GitHub actions, this is a CI/CD tool that handles the building, testing, and deployment automation process using a custom workflow or script.
- Ansible: An open-source tool for task automation like software provisioning, configuration management, inventory management, and application deployment via playbooks.
- Puppet: An automation tool that manages infrastructure and application delivery, providing version control and audit capabilities.
- Terraform: An infrastructure as a code tool that enables the management of cloud services through automation scripts, removing the struggle of using manual processes and configurations.
While knowing the right criteria to check when choosing your automation tools is key to optimizing your workflow, understanding how to implement the tools is also very important. Let’s look at an example implementation using the custom command feature in Cody by Sourcegraph for automation.
Step 3: Implement the automation tools (Cody custom commands)
Cody by Sourcegraph is a powerful VSCode extension that can be customized to fit your workflow automation needs. It leverages artificial intelligence (AI) to offer quick, ready-to-use commands for common actions such as writing, describing, fixing, and refactoring code.
These commands allow you to run predefined actions with smart context-fetching anywhere in the editor. Like the autocomplete and chat feature in Cody, the commands feature will search for context in your codebase to provide more contextually aware and informed answers.
Cody’s built-in commands can handle tasks like:
edit- For editing, fixing, and generating new code.explain- For explaining code.test- For generating unit tests.doc- For generating code documentation.smell- For improving code quality.
You can also create custom commands with Cody, which will be the focus of the next section. Writing API specs for your application is a tedious task developers must complete to provide a well-documented API for external use. You can automate this process using Cody's custom commands, which will generate documentation for each endpoint in the file where the command is run.
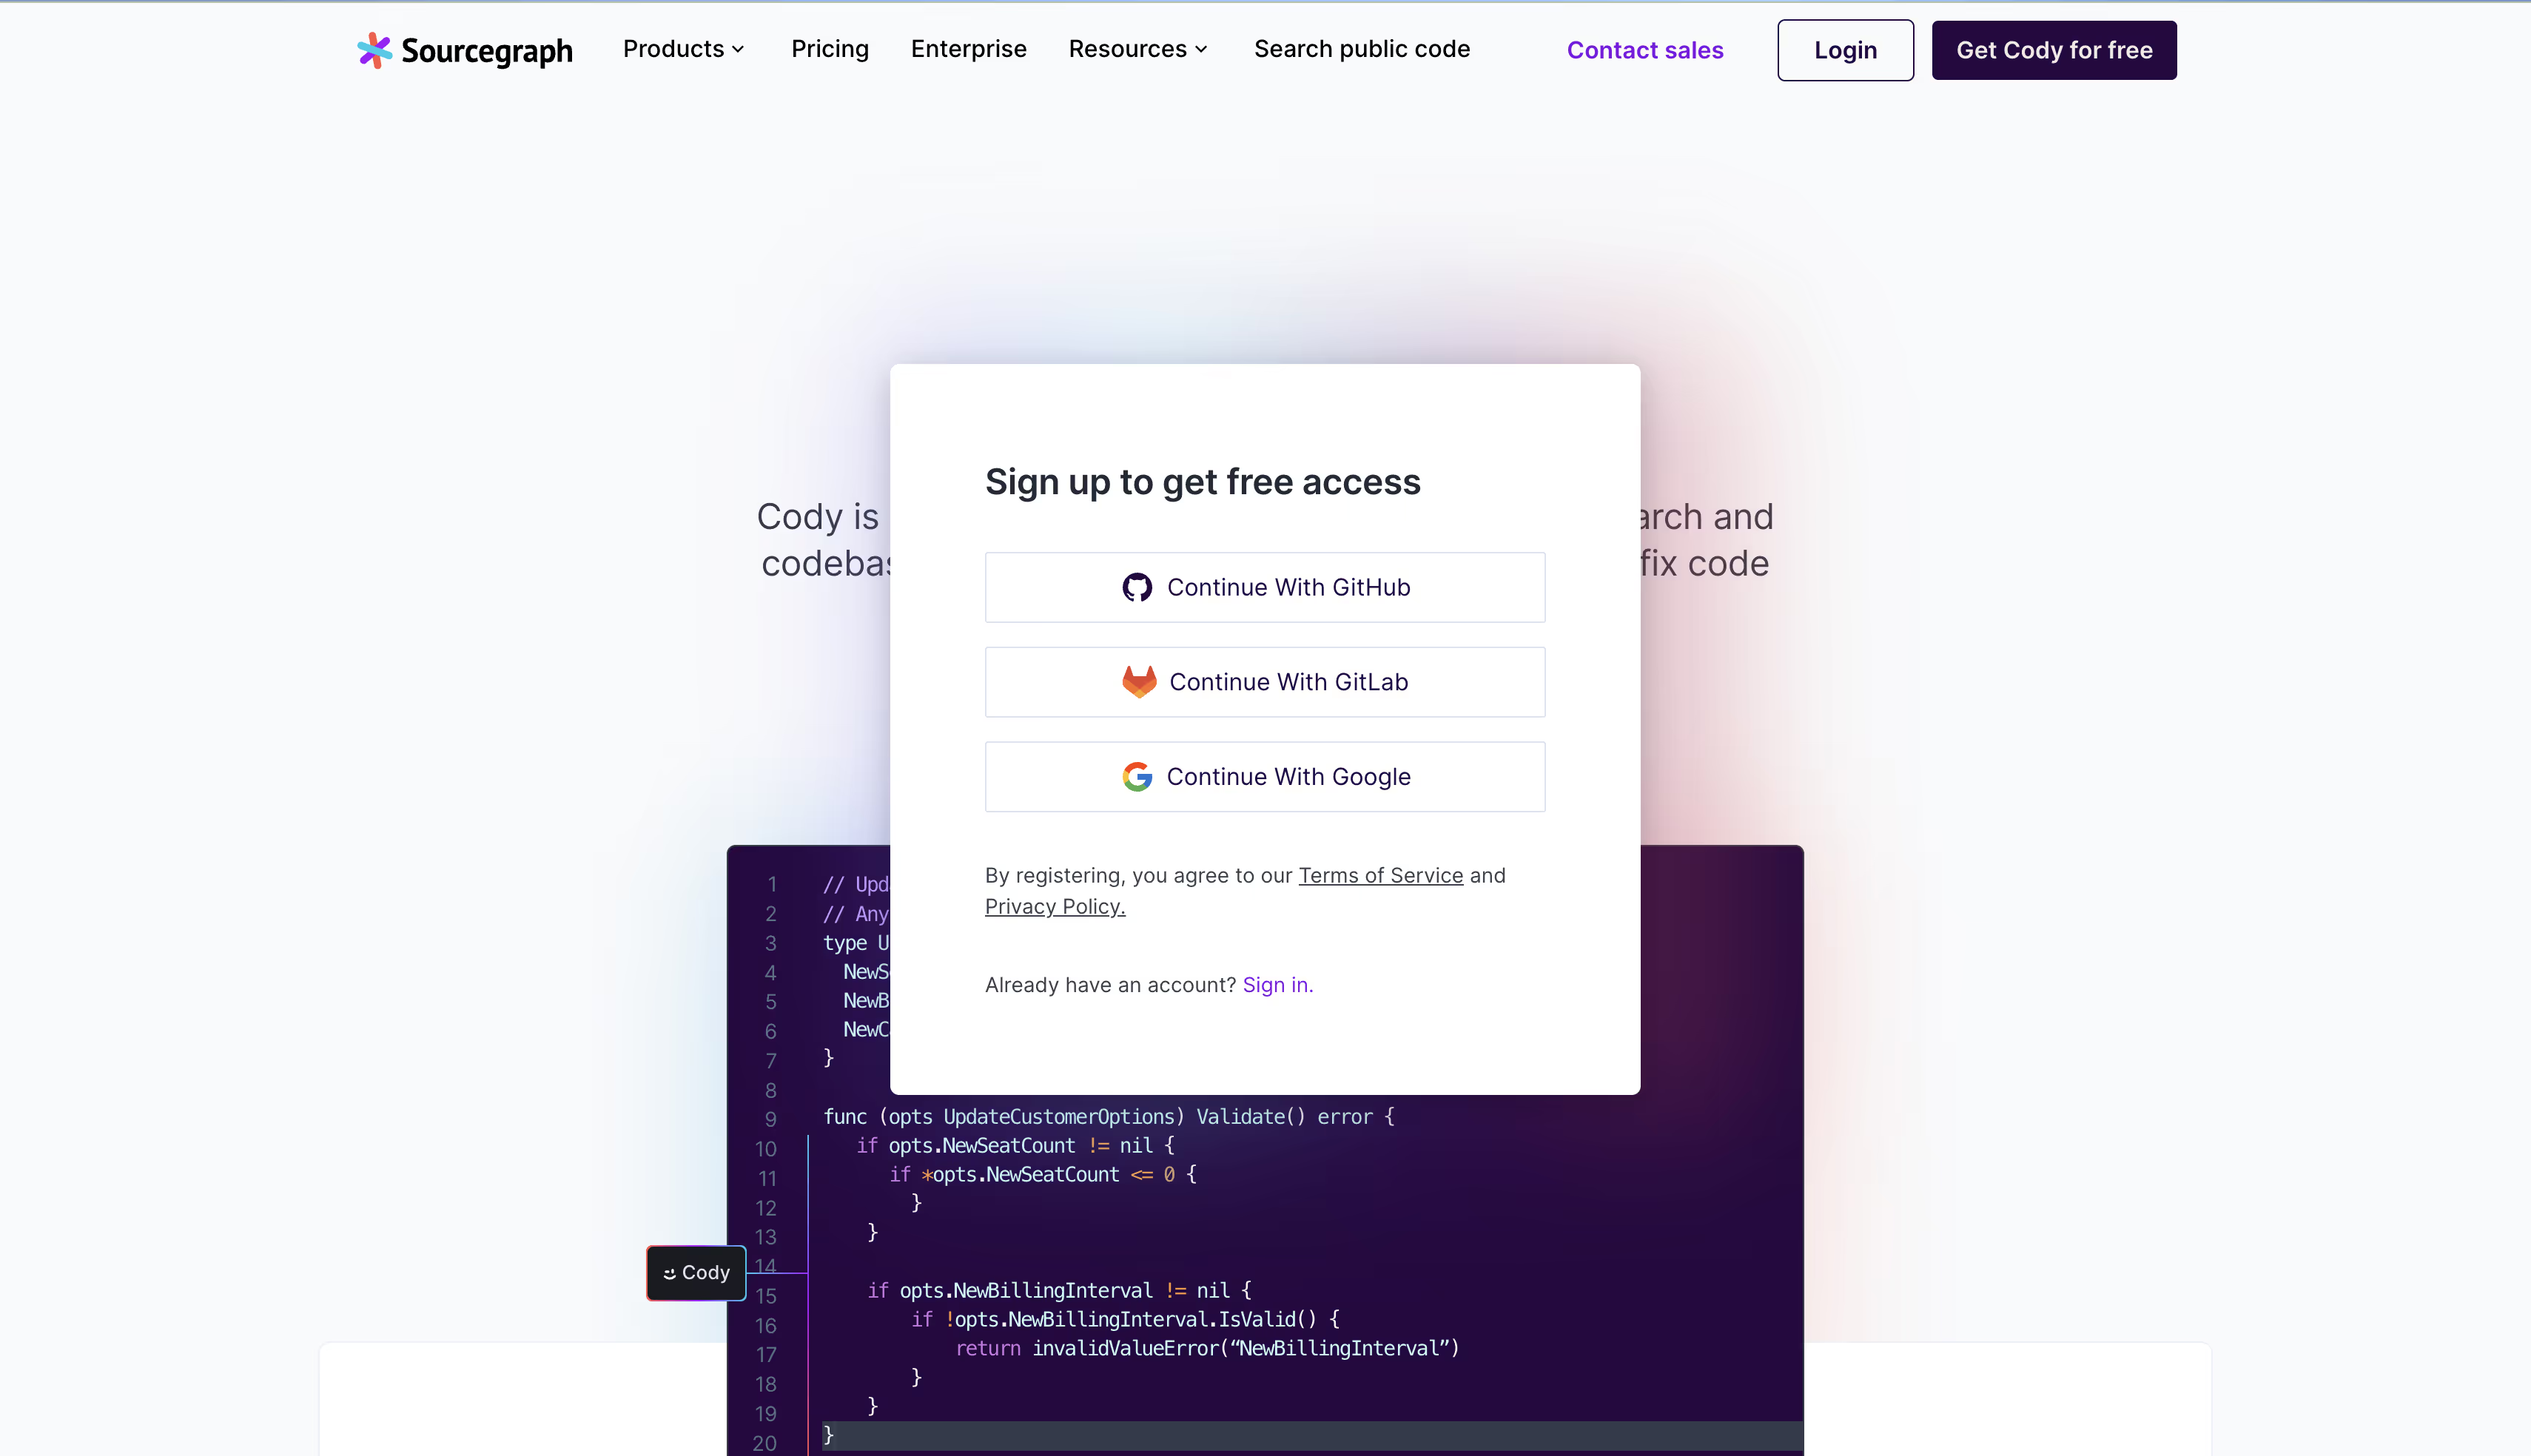
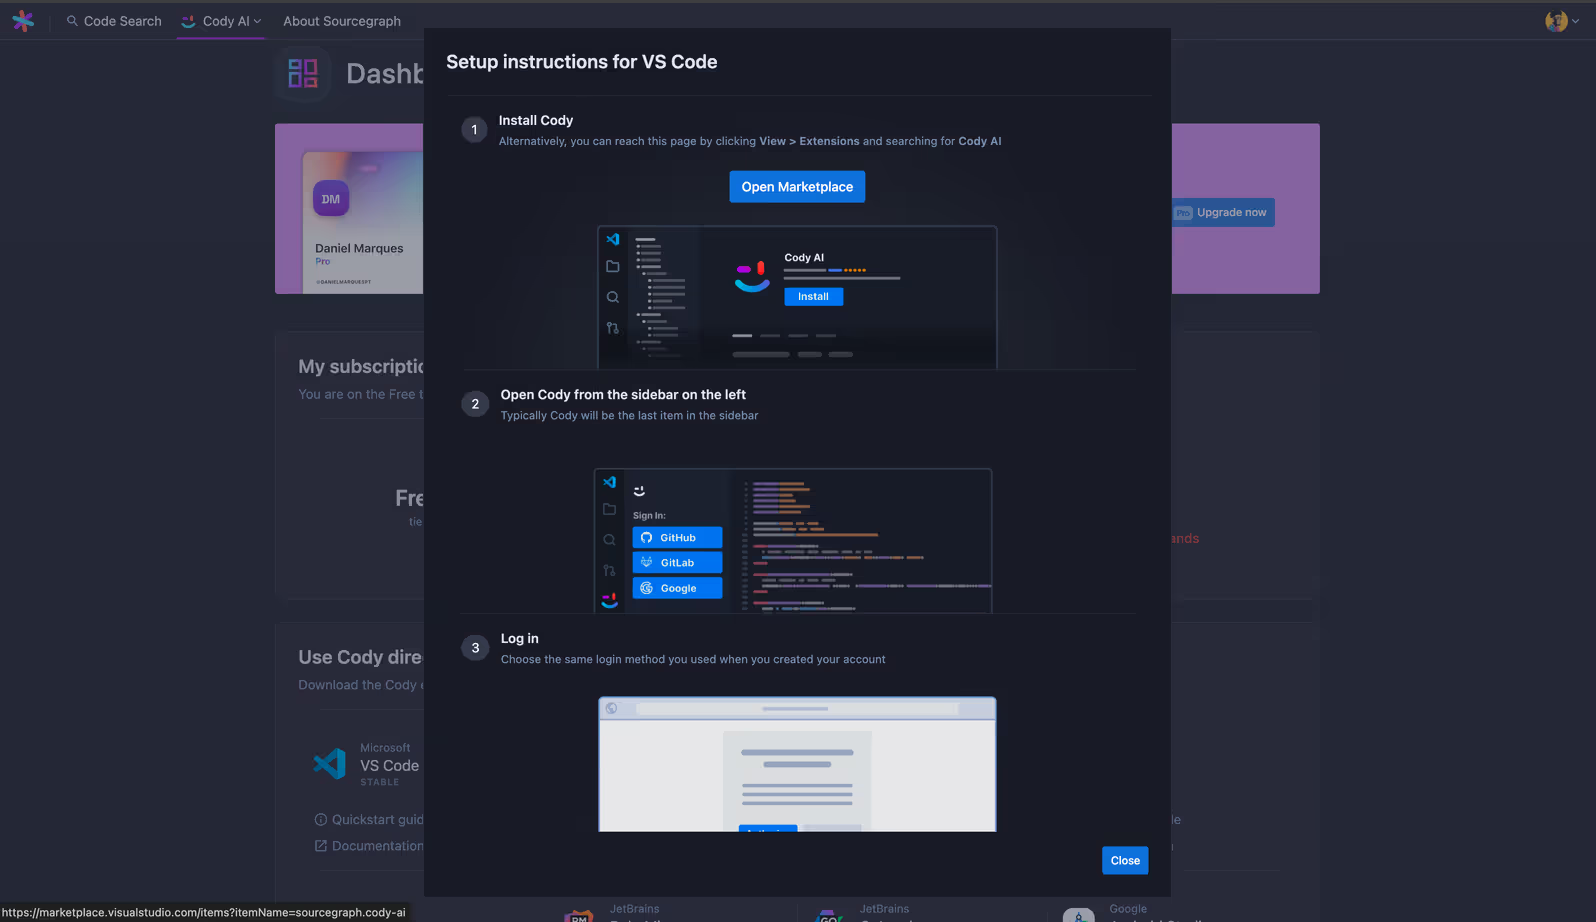
Implementing custom commands with Cody VSCode extension Setting up the Cody VSCode extension is straightforward. The illustration below shows how to create an account and install the extension in your VSCode code editor:
- If you don’t already have an account, go to the Cody by Sourcegraph website and sign up.
- To install the extension, click the VSCode icon in the dashboard area after signing up. It will automatically take you to the code editor to complete the installation process. Alternatively, you can open your code editor, click View from the top-level menu, select Extensions, and search for Cody AI. Install the extension and log in with the authentication method you used at sign-up.
Support for the commands feature may vary by IDE extension. Read the feature parity reference to learn what commands are available in your IDE.
Now that your setup is complete, you can create custom commands via the Cody extension. A good use case of custom commands is generating an open API specification for Swagger from the codebase using Cody’s custom commands. Here are the steps to follow to achieve that:
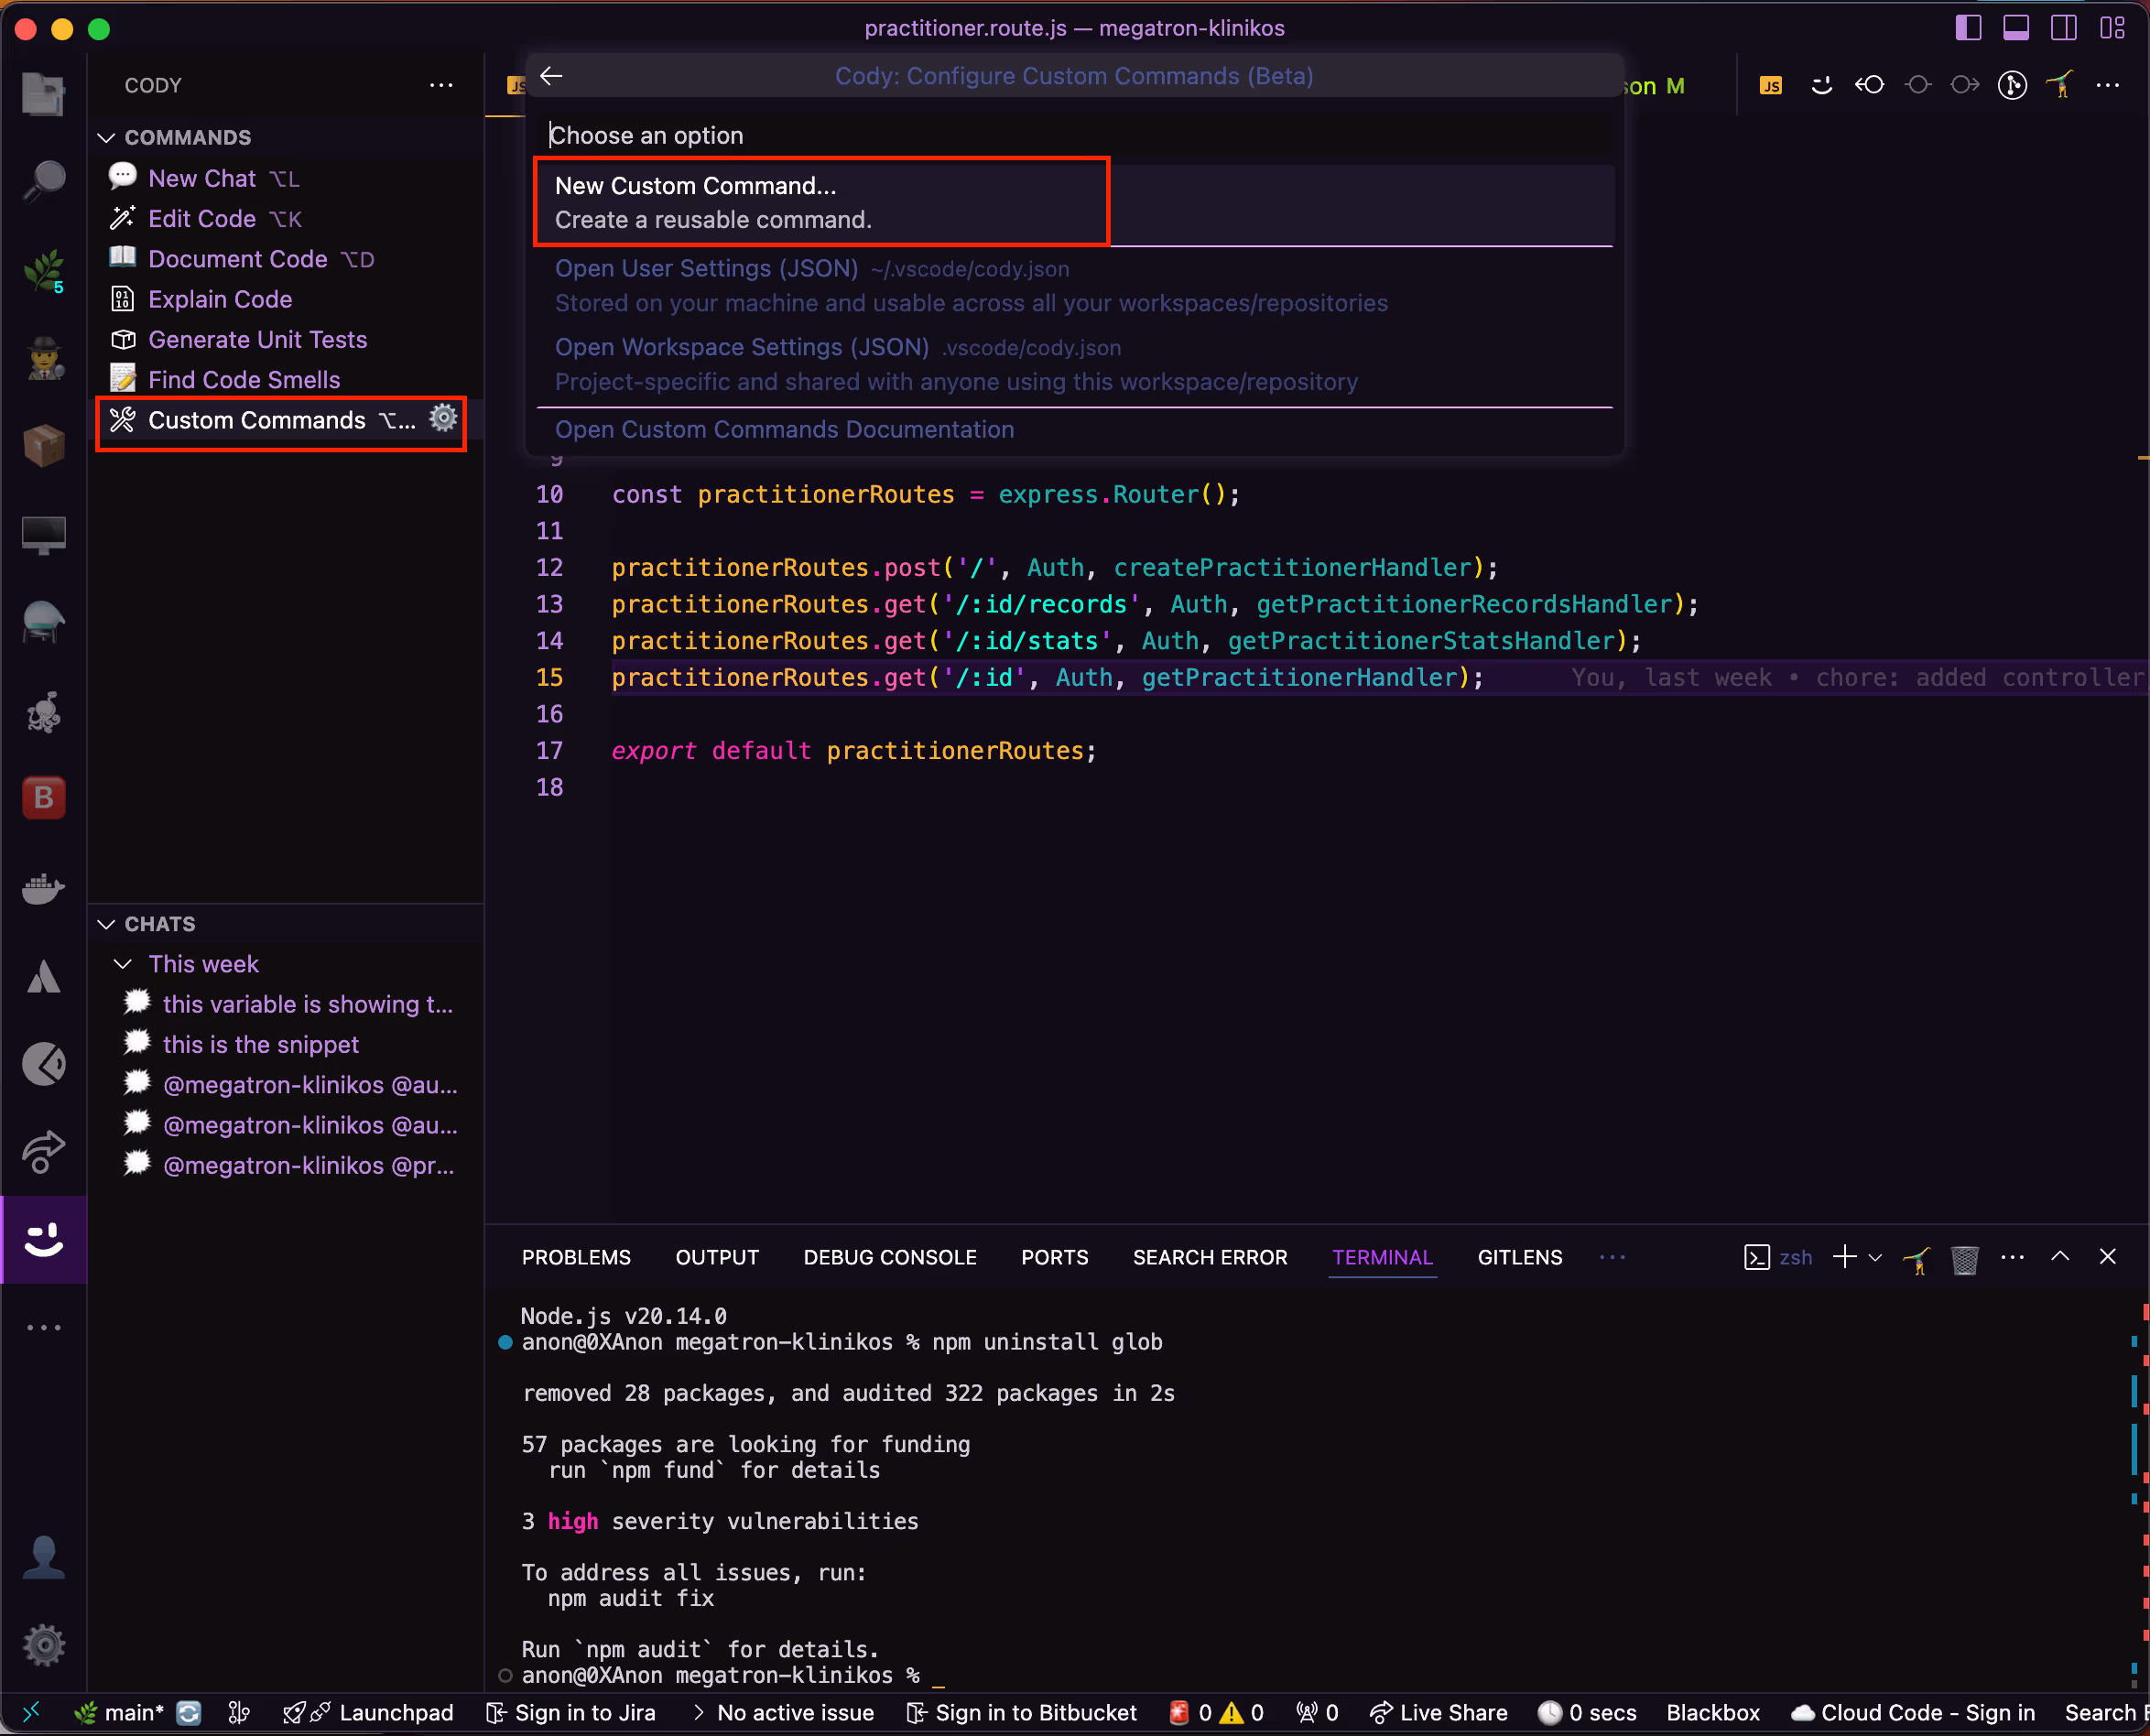
- Clicking the Custom Commands button will prompt you to create a new reusable command or open the settings for Cody for your workspace or user account. Select New Custom Command.
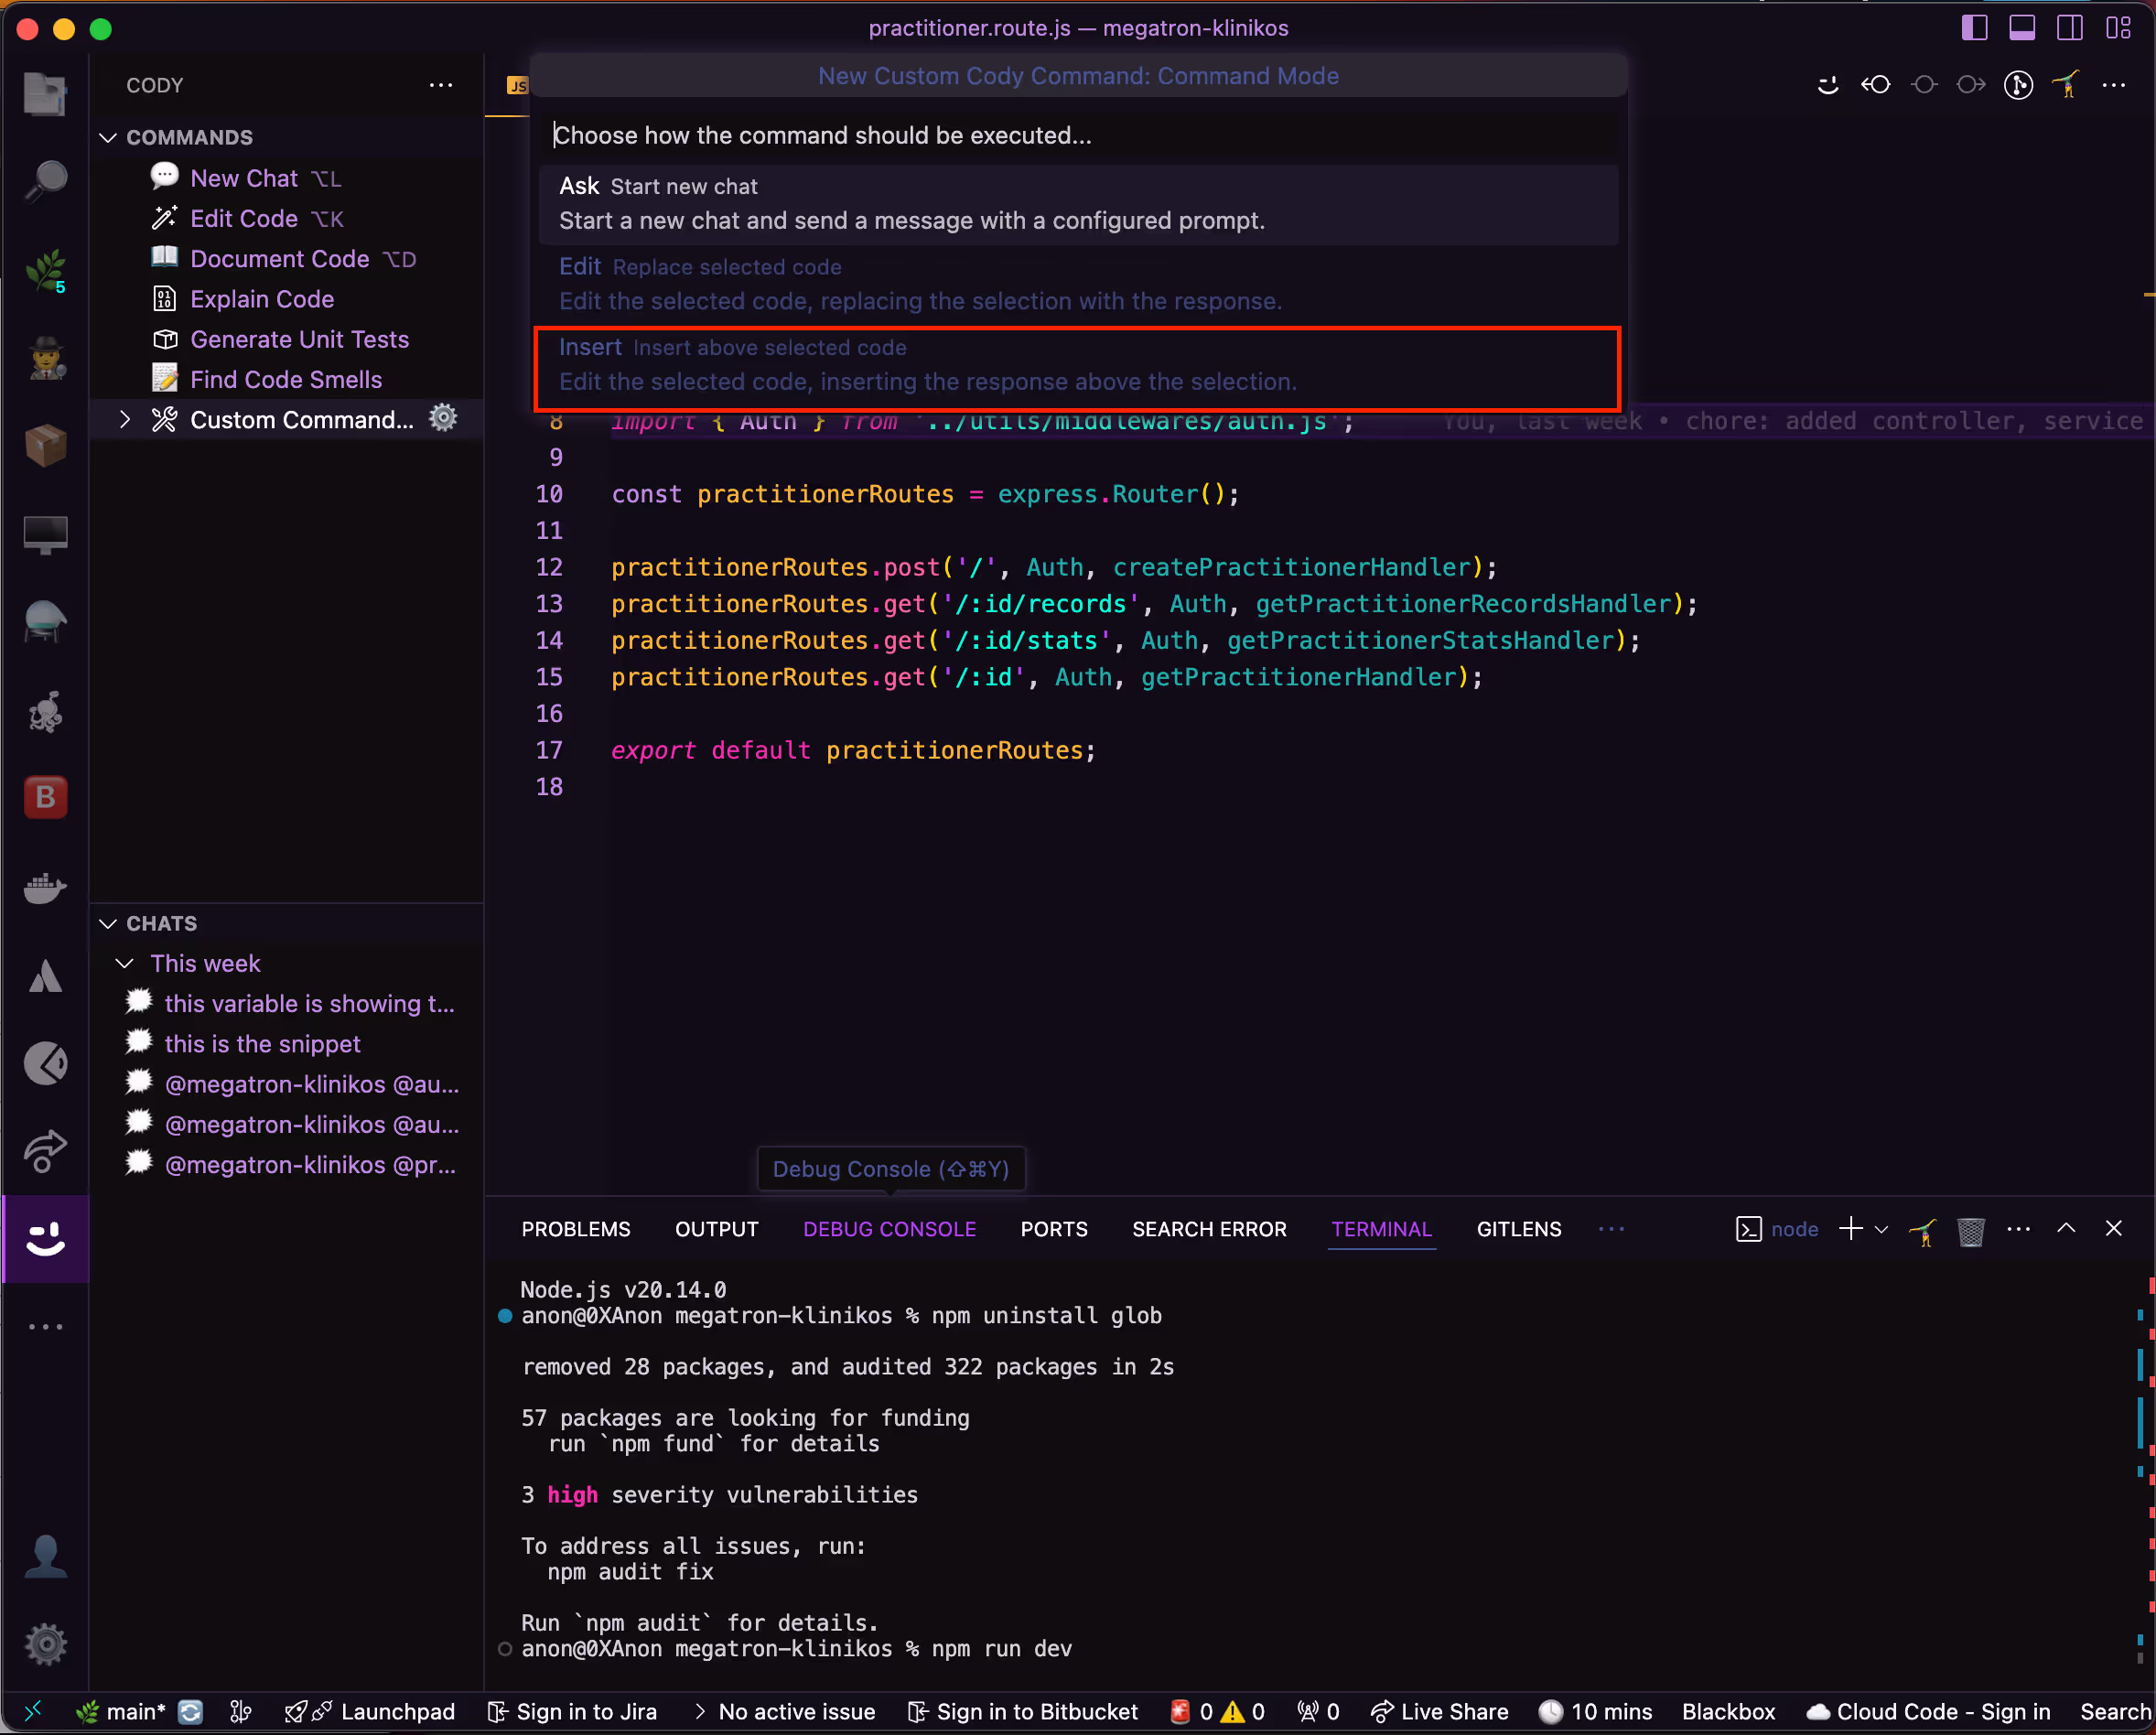
- The second step is to choose how the command runs. For this example, insert the new code generated above the selected code.
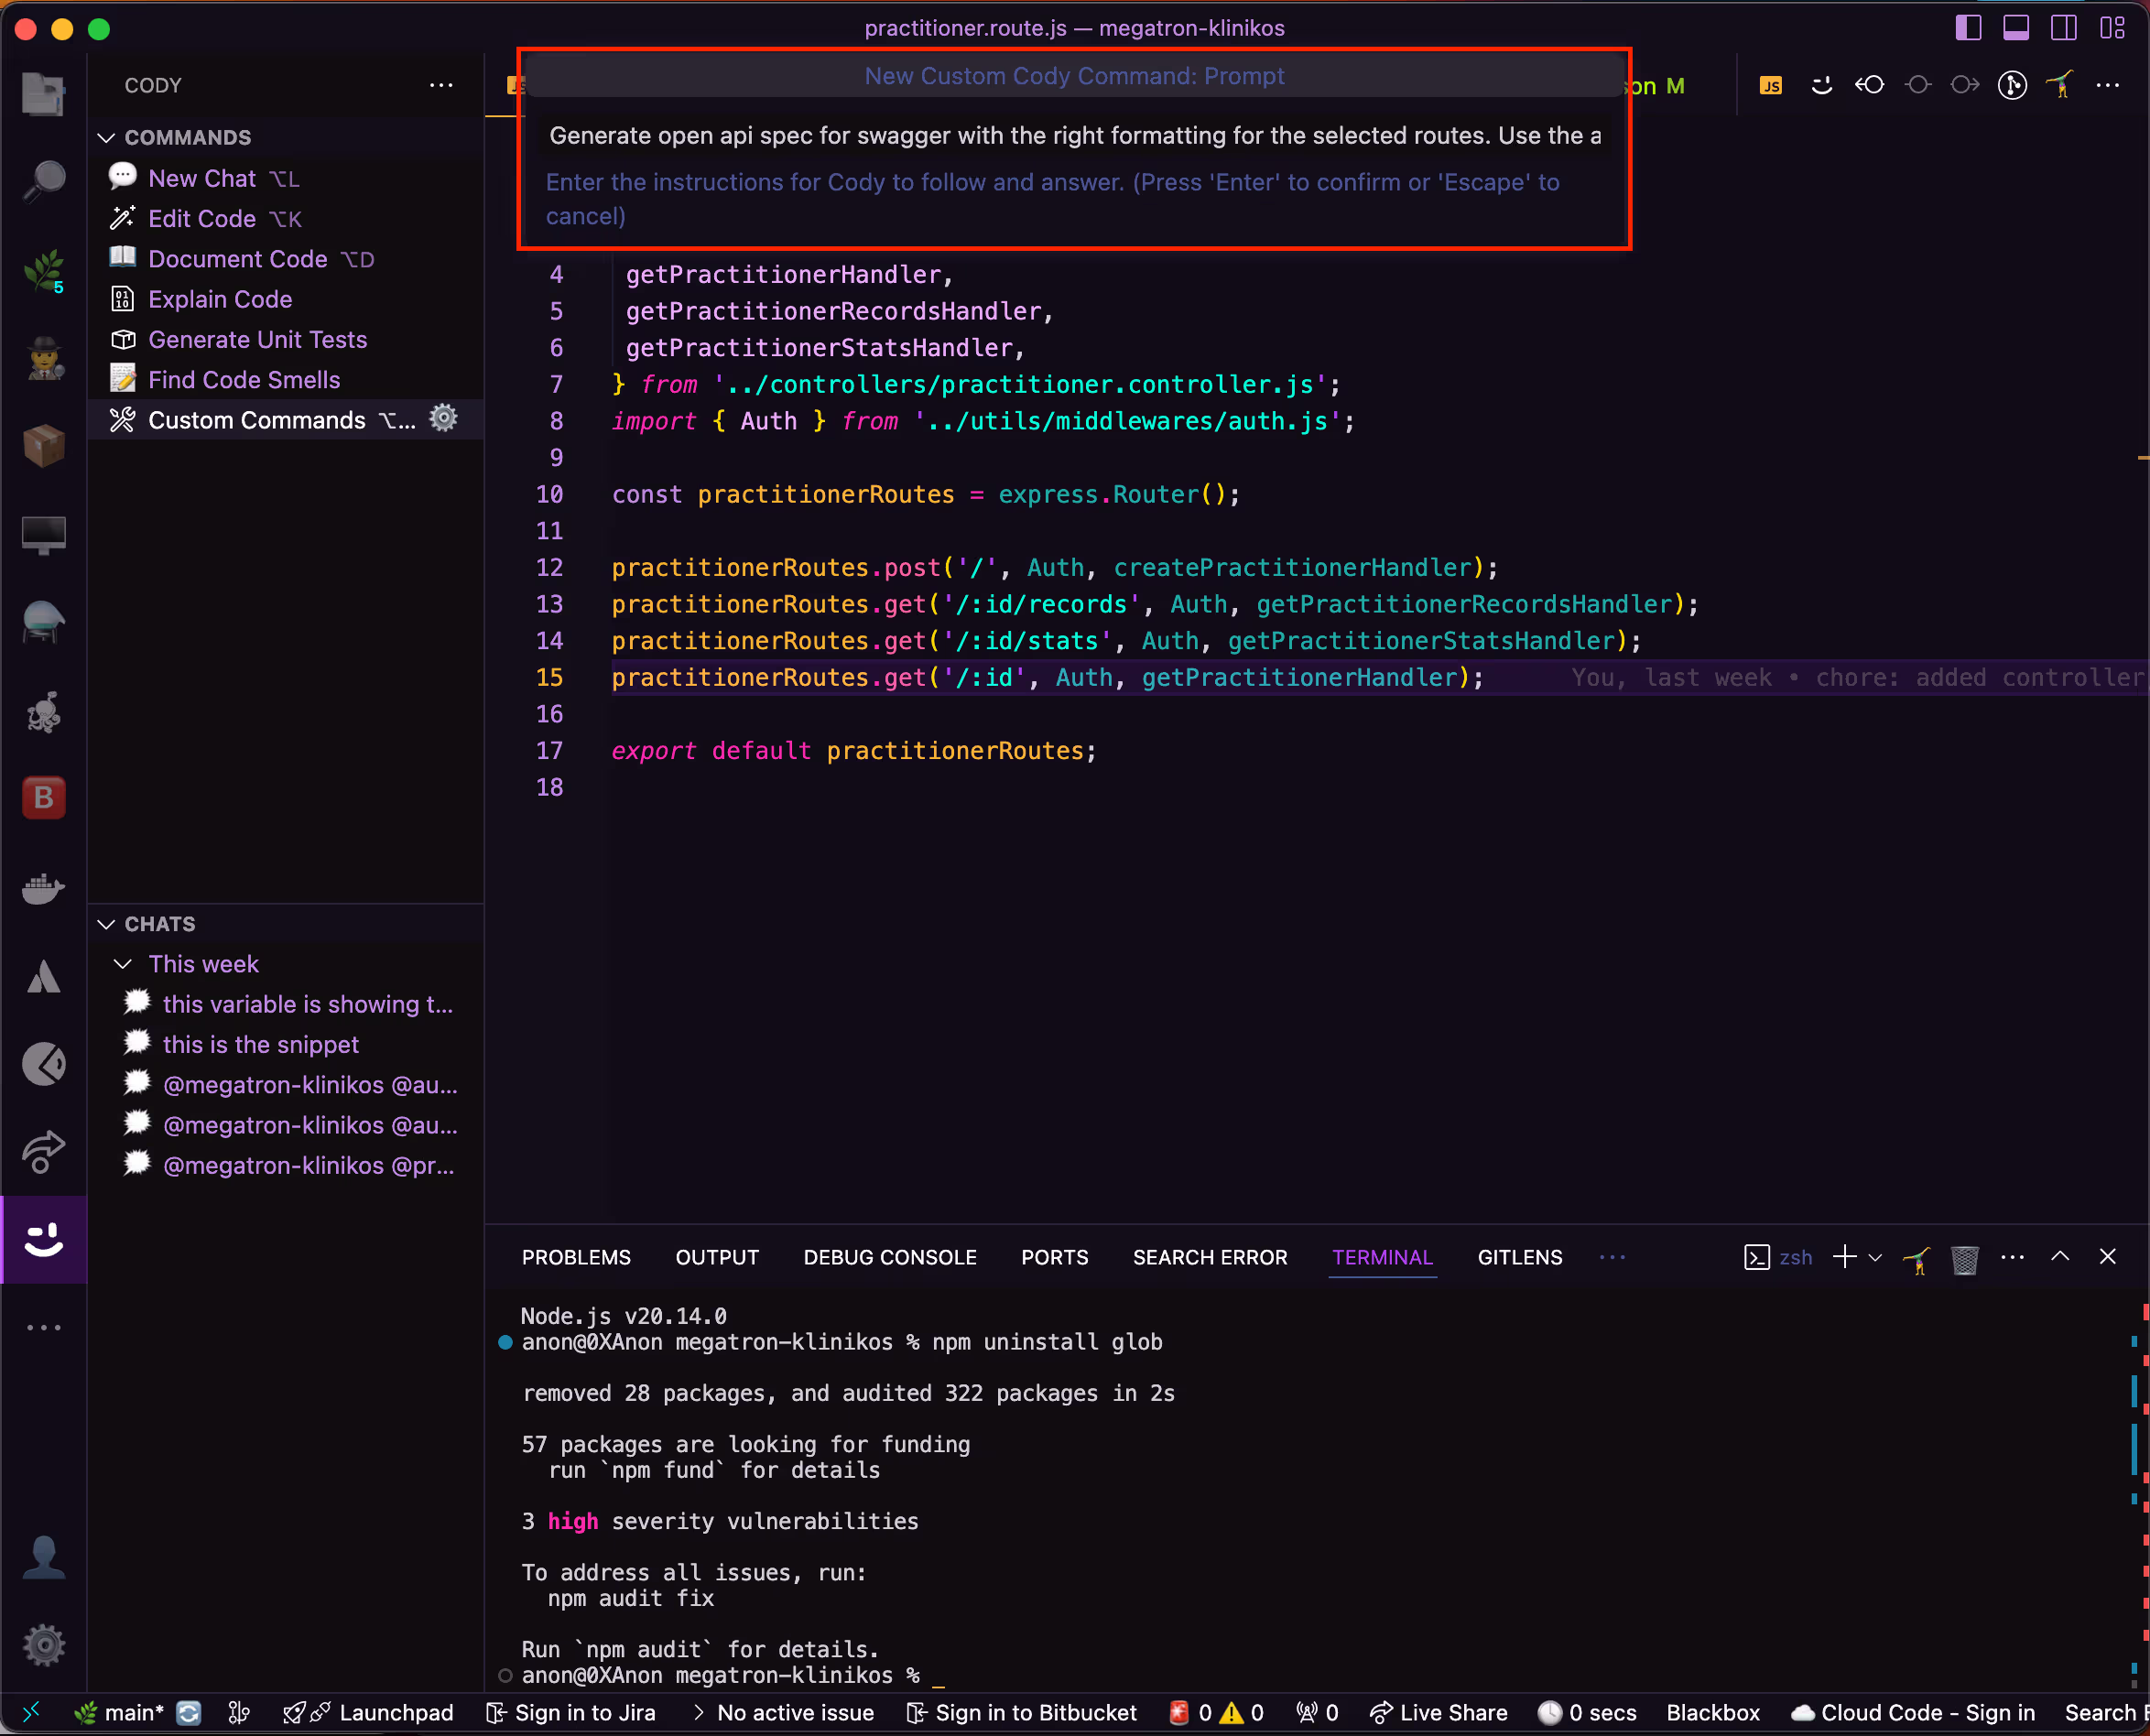
- After creating the name and setting how the command will run, you will add the prompt that Cody will use to perform the desired actions.
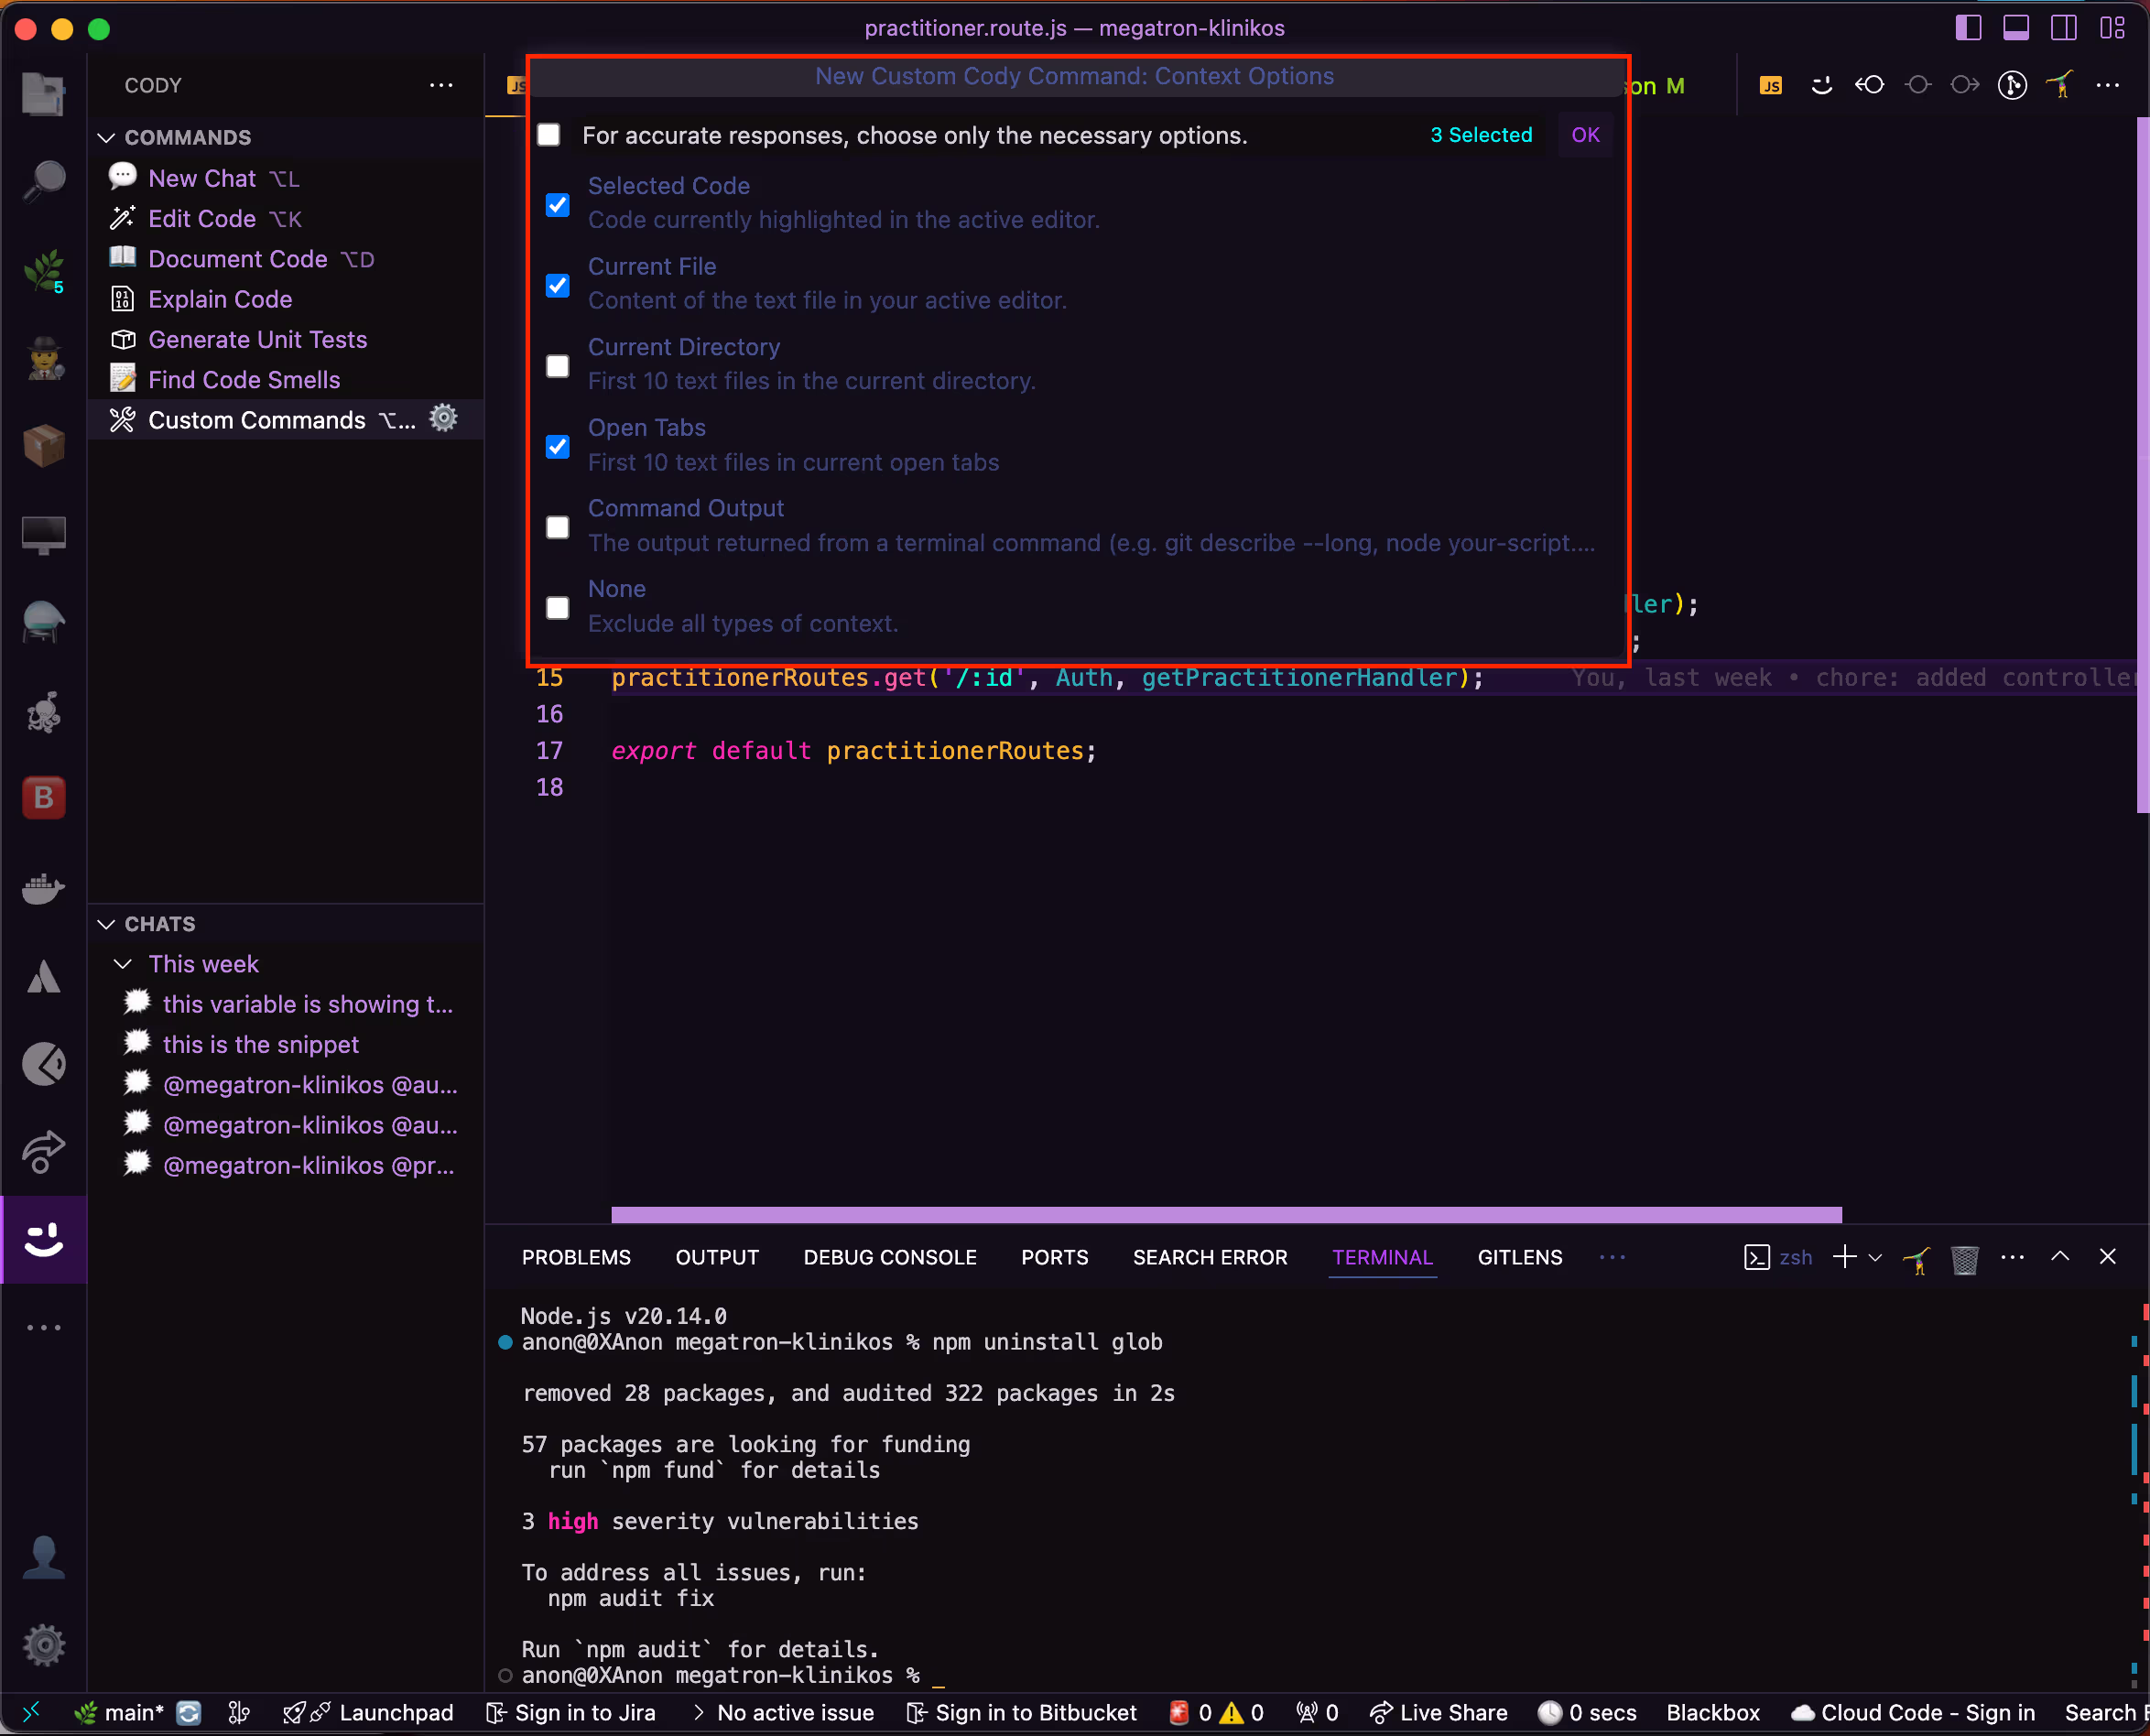
- Select the context in which the new command will run. For this example, set the command to pick context from the current file and the open tabs in our code editor.
You can save your custom command settings to your machine globally for all workspaces or to a particular workspace. In this example, the setting was saved for all workspaces or projects. Below is a 60-second video demo showing how the custom command works for code generation.
Creating custom commands with Cody
Note that the quality of your custom commands' responses depends on which large language model (LLM) Cody uses. Cody uses Claude 3.5 Sonnet by default, but you can upgrade to Pro to access other models like GPT-4o and Gemini 1.5 Pro.
Now that you know one of Cody's automation techniques for open API specs generation from your codebase, you should understand how to merge this technique into the workflow.
Step 4: Integrate the automation into your code workflows
As there isn’t a one-size-fits-all approach to automation and considering each person’s system is unique, here are some tips for integrating designed automation into your code workflow:
- Start small, think big: First, automate the most repetitive tasks. These are usually the low-hanging fruit that can be automated quickly and easily. Once these tasks run smoothly, gradually expand your automation efforts to include more complex processes till you achieve wider coverage. This step-by-step approach allows you or your team to adapt to new automation tools and techniques without getting overwhelmed.
- Stay up to date: Regularly update your automation scripts and tools. Automation technology continually evolves, with new features and security enhancements being released regularly. By keeping your tools and scripts up to date, you ensure you’re leveraging the latest advancements and maintaining a secure environment. Regular updates also help avoid potential vulnerabilities and compatibility issues interrupting your automated workflows.
- Create a feedback loop: Establish a feedback loop with your team. Continuous feedback is essential for improving and enhancing your automation processes over time. Encourage team members to share their experiences, challenges, and suggestions for improvement. This collaborative approach encourages a culture of continuous improvement and innovation, guaranteeing that your automation strategies remain aligned with your organization's evolving needs.
Next are some best practices for maintaining and updating these integrations over time to ensure workflow longevity.
Step 5: Maintain and update the automation
- Modularity: Keep your commands in components to facilitate easy updates and maintenance. By designing your automation scripts in modules, you can isolate different functionalities and make them easier to manage and reusable. This approach allows you to easily update or replace specific parts of your automation setup without updating the whole system.
- Documentation: Document each custom command so team members can understand and use it effectively. Comprehensive documentation serves as a reference, which in turn helps you to quickly understand the functionality of every piece of your automation workflow. If a team is involved, onboarding new people to use the automation setup will not be a struggle. Clear documentation reduces the learning curve and minimizes the risk of errors or miscommunications.
- Testing and monitoring: Regularly test your commands and monitor your automated tasks to confirm they perform as expected and not introduce new issues. Regular testing helps you identify and address potential issues early, preventing disruptions in your automated workflows. Consider using the automated testing tools discussed above to streamline this process for consistent and thorough coverage.
Conclusion
Embracing automation in the software development process has the potential to transform workflows, save time, and increase productivity. Identifying repetitive tasks, selecting the appropriate tools, and implementing customized solutions can greatly improve your coding standards and reduce the burden of routine tasks.
Cody is a valuable tool for automating various development activities including code generation, refactoring, documentation, fixing coding issues, and generating unit tests.
Integrating Cody into your workflow unlocks new levels of project efficiency and results in faster, more reliable, and higher-quality outcomes.
.avif)

